
The explosion of AI image generation has fundamentally changed how we create visual content. Tools like Midjourney, DALL-E 3, Stable Diffusion, and Leonardo.AI are now producing stunning visuals that rival professional photography. But there’s a critical gap between generating a beautiful AI image and actually deploying it on a website.
Most AI-generated images are wildly oversized for web use. A single Midjourney upscale can easily exceed 5-8MB, and if you’re generating dozens of images for a blog post, product gallery, or marketing campaign, you’re looking at catastrophic page load times. This isn’t just an inconvenience—it directly impacts your search rankings, conversion rates, and user experience.
Let’s walk through the complete workflow for taking AI-generated images from creation to web-ready production.
The AI Image Problem: Beautiful but Bloated
AI image generators prioritize quality over file size, and rightfully so. When Midjourney outputs a 1024×1024 or 2048×2048 image, it’s optimized for visual fidelity, not web performance. These images typically come in PNG format with massive file sizes because they preserve every detail the AI model generated.
Here’s what you’re typically dealing with:
- Midjourney upscales: 4-8MB per image (PNG format)
- DALL-E 3 outputs: 2-5MB per image
- Stable Diffusion renders: 3-6MB depending on settings
- Leonardo.AI generations: 2-7MB based on resolution
Now multiply that by 10, 20, or 50 images for a content-heavy site, and you’re serving hundreds of megabytes of image data. Google’s Core Web Vitals will tank, mobile users will bounce, and your SEO will suffer.
The good news? You can dramatically reduce these file sizes without sacrificing visual quality. The key is having an efficient compression workflow that handles the batch nature of AI content creation. Before uploading AI-generated images to your website or CMS, you should always compress your images to ensure optimal performance and faster load times.
Step 1: Choose the Right Resolution from the Start
Before you even think about optimization, generate images at appropriate sizes. Most AI tools let you specify dimensions, and this is where strategic thinking pays off.
For hero images and featured content: 1920×1080 or 2048×2048 is fine—these need to look stunning.
For blog thumbnails and cards: 1024×1024 is more than sufficient. There’s no reason to upscale an image that will display at 400×400 pixels on your blog grid.
For icons and UI elements: 512×512 maximum. AI-generated icons don’t need to be poster-sized.
Many developers make the mistake of generating everything at maximum resolution “just in case.” This creates unnecessary work downstream. Be intentional about your output dimensions based on actual use cases.
Step 2: Format Conversion—PNG Isn’t Your Friend
AI generators love PNG because it’s lossless and preserves transparency. But for web deployment, PNG is rarely the optimal choice unless you absolutely need that transparent background.
WebP should be your default format. It offers superior compression compared to JPEG while maintaining excellent visual quality. Modern browsers have near-universal WebP support (97%+ as of 2026), and the file size savings are dramatic—typically 25-35% smaller than equivalent JPEG files.
AVIF is the cutting edge. If you’re targeting modern browsers exclusively, AVIF compression is even more efficient than WebP, often achieving 50% smaller file sizes. However, browser support is still catching up, so you’ll want fallbacks.
JPEG still has a place for complex photographic AI images where you need broad compatibility and don’t have transparency requirements.
The conversion process matters too. Don’t just change the file extension—you need proper encoding with the right quality settings. Most AI images can handle 80-85% quality compression in WebP or JPEG format without visible degradation.
Step 3: Compression—The Critical Optimization Step
This is where most people either skip entirely or do it wrong. Compression is non-negotiable if you want performant web pages.
For individual images, the process is straightforward: run them through a compression tool that strips unnecessary metadata, optimizes color profiles, and applies intelligent lossy compression while preserving visual quality.
But here’s where AI workflows get tricky: you’re rarely working with one or two images. AI content creation is inherently batch-oriented. You might generate 30 product variations, 50 blog illustrations, or 100 social media assets in a single session.
This is where bulk processing becomes essential. Manually compressing dozens of AI-generated images one-by-one is soul-crushing and inefficient. When you’re dealing with multiple files from a Midjourney batch or Stable Diffusion session, using a bulk image compressor saves enormous amounts of time and ensures consistent quality across all your assets.
The key is finding the sweet spot: maximum compression without visible artifacts. For most AI-generated images, you can safely achieve 60-80% file size reduction without anyone noticing the difference. This means your 6MB Midjourney export becomes a lean 1.2-1.8MB file that loads instantly while maintaining the visual impact that makes AI-generated content valuable.
Step 4: Responsive Image Implementation
Compressing your AI images is only half the battle. How you serve them matters enormously.
Implement srcset attributes to serve different image sizes based on device viewport. A mobile user doesn’t need your full 2048px Midjourney masterpiece—they need a 640px version that loads instantly.
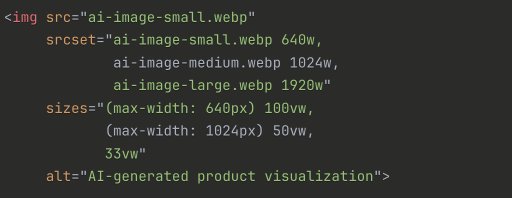
This approach ensures you’re delivering the right file size for every device, maximizing performance without sacrificing quality where it matters.
Step 5: Lazy Loading and Modern Loading Strategies
AI-generated images are often used in galleries, portfolios, or content-heavy pages where dozens of images appear below the fold. Loading all of them immediately is wasteful.
Enable native lazy loading:

This simple attribute defers loading until images are about to enter the viewport, dramatically improving initial page load times.
The Production Workflow: Putting It All Together
Here’s what an efficient AI-to-web workflow looks like:
- Generate images at appropriate resolutions based on use case
- Batch export from your AI tool (Midjourney, DALL-E, etc.)
- Compress all images in one operation to reduce file sizes by 60-80%
- Convert to modern formats (WebP/AVIF) with fallbacks
- Create responsive variants for different device sizes
- Upload to CDN with proper caching headers
- Implement lazy loading for below-the-fold images
The entire process should take minutes, not hours. Automation is your friend here—the more you can batch process, the more scalable your AI content workflow becomes.
Measuring Success: Performance Metrics That Matter
After optimization, measure the impact:
- Lighthouse scores: Aim for 90+ on Performance
- Largest Contentful Paint (LCP): Should be under 2.5 seconds
- Total page weight: Compare before/after optimization
- Time to Interactive (TTI): Monitor improvements
These metrics directly correlate with user experience and search rankings. A well-optimized AI image workflow can improve your Lighthouse performance score by 20-30 points.
Common Mistakes to Avoid
Over-optimization: Don’t compress so aggressively that you introduce visible artifacts. AI-generated images often have subtle details that harsh compression destroys.
Ignoring alt text: AI images still need descriptive alt text for accessibility and SEO. Don’t skip this step.
Skipping format modernization: Serving PNG files because “that’s what Midjourney gave me” is leaving massive performance gains on the table.
No version control: Keep your original high-res AI generations archived. You might need them later for print or alternative uses.
The Bottom Line
AI image generation has democratized high-quality visual content, but it’s introduced new workflow challenges. The gap between generation and production deployment is filled with optimization steps that can’t be skipped without consequences.
The good news? With the right tools and workflow, optimizing AI-generated images is fast and painless. Compression, format conversion, and responsive implementation should be automatic steps in your content pipeline—not afterthoughts.
Get this right, and your AI-powered website will load fast, rank well, and deliver stunning visuals without the performance penalty. Get it wrong, and you’ll watch users bounce while your competitors with optimized images capture the traffic you deserve.
The AI revolution gave us incredible image creation capabilities. Now it’s time to make sure those images actually perform in production.